

Website Hosted On Ec2, Domain Registered At Gandi.net.. How Do I Properly Configure The Domain?
Betoken to DigitalOcean Nameservers From Common Domain Registrars
DNS (Domain Name System) is a naming arrangement that maps a server's domain name, similar example.com, to an IP accost, like 203.0.113.1. This is what allows you to straight a domain name to the spider web server hosting that domain'south content, for example.
To ready a domain name, you lot need to purchase a domain name from a domain name registrar so gear up DNS records for it. Registrars are organizations that have completed an accreditation process that allows them to sell domain names. Registrars typically offer services to manage DNS records as well, only one time you have purchases a domain, nigh registrars will allow you to manage your DNS records with other providers.
DigitalOcean is not a domain name registrar, only y'all can manage your DNS records from the DigitalOcean Control Panel. This can make record management easier because DigitalOcean DNS integrates with Droplets and Load Balancers.
Prerequisites
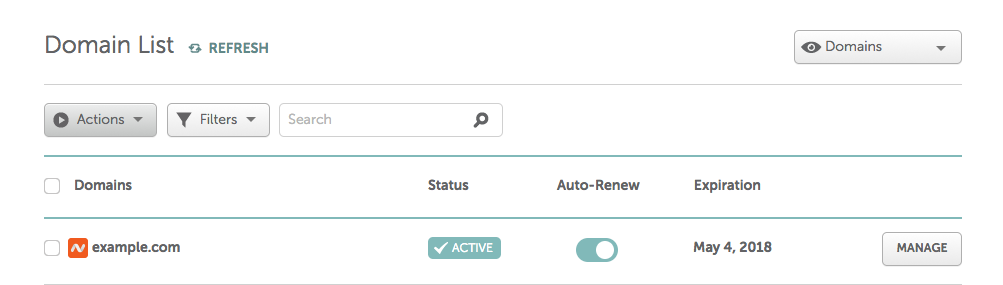
To follow forth with this tutorial, you volition need a domain proper noun that yous ain or command.
If y'all need to expect upwards your domain's registrar, you tin use the ICANN WHOIS website or utilize the whois command from a Linux or macOS terminal:
The registrar'south website is located on the Registrar URL line:
Excerpt of whois output Domain Name: Case.COM Registry Domain ID: 2336799_DOMAIN_COM-VRSN Registrar WHOIS Server: whois.iana.org Registrar URL: http://res-dom.iana.org Updated Date: 2017-08-14T07:04:03Z Creation Date: 1995-08-14T04:00:00Z . . . To change the nameservers, y'all'll demand to log into the domain registrar'southward account management section. In one case y'all're logged in, follow the directions for your registrar below. If your registrar is non included, check their documentation for irresolute nameservers.
Instructions
To employ DigitalOcean DNS, yous'll demand to update the nameservers used by your domain registrar to DigitalOcean's nameservers instead. In this commodity, we'll show yous how to look upward the registrar for your domain, then provide step-by-step guidance on how to update the nameserver settings for the following registrars:
This section of the guide was last updated on February sixteen, 2018
-
Sign in to your GoDaddy account.
-
On your account homepage, click the DNS tab on the right-hand side of the Domains chief folio. It volition be located in between the Add together Privacy and Manage tabs.

-
On the side by side screen, navigate to the section of the folio that reads Nameservers. Click Change.
-
When prompted, select Custom from the drib-down menu, and enter the following nameservers:
- ns1.digitalocean.com
- ns2.digitalocean.com
- ns3.digitalocean.com

Note that you will have to click Add Nameserver to add the concluding entry. Click Save to apply your changes.
-
Now yous are ready to motion on to connecting the domain with your Droplet in the DigitalOcean control panel. Check out the Conclusion section at the finish of this article to detect out about what to do next.
This section of the guide was last updated on February xvi, 2018
-
Sign into your HostGator account.
-
Click on the domain name that y'all want to use with your Droplet.
-
You will then be presented with a Domain Overview. Click on Modify under Name Servers.

-
Select Manually gear up my name servers and enter the post-obit:
- ns1.digitalocean.com
- ns2.digitalocean.com
- ns3.digitalocean.com

Annotation that you will have to click the dark-green + symbol to add the third name server.
-
Click Salvage Name Servers to apply your changes. At present you are set up to move on to connecting the domain with your Droplet in the DigitalOcean control panel. Bank check out the Conclusion section at the end of this article to read near what to exercise next.
This section of the guide was last updated on October 10, 2017
-
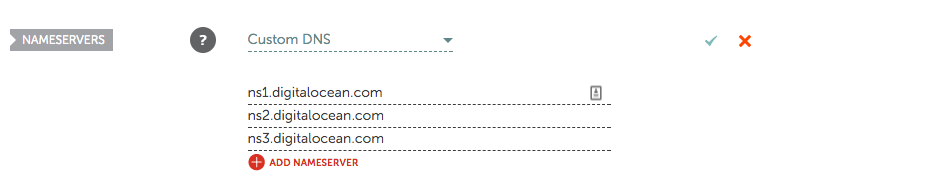
Sign in to your Namecheap account, then click Domain Listing in the left-hand cavalcade. Yous volition exist presented with a dashboard listing all of your domains. Click the Manage push button of the domain you'd like to update.
-
In the Nameservers section of the resulting screen, select Custom DNS from the dropdown menu and enter the following nameservers:
- ns1.digitalocean.com
- ns2.digitalocean.com
- ns3.digitalocean.com
-
Click the green checkmark to employ your changes. Now you are ready to move on to connecting the domain with your Droplet in the DigitalOcean control panel. Check out the Conclusion section at the end of this article to read on what to exercise next.
This department of the guide was last updated on Feb 16, 2018
-
Sign in to your one&1 account and become to Domains tab on the left side of your homepage.

-
One time on the Domains landing page, click on your domain proper noun.
-
On the adjacent folio, click on Alter DNS Settings.
-
Under Proper noun Server Settings, select Other name servers. Enter the following nameservers:
- ns1.digitalocean.com
- ns2.digitalocean.com
- ns3.digitalocean.com

-
Gyre downwards to the bottom of the folio and click Save to apply your changes. Now yous are set to motion on to connecting the domain with your Droplet in the DigitalOcean control panel. Check out the Conclusion department at the cease of this article to read about what to practise adjacent.
This department of the guide was terminal updated on February 16, 2018
-
Sign in to your Proper noun.com account.
-
Click on the My Business relationship icon, and select My Dashboard from the dropdown carte du jour.

-
On the Dashboard screen, click on your domain proper noun.
-
On the your domain'southward home screen, click on Nameservers, on the left side of your screen.

-
Yous will exist presented with the option to Edit each of your nameservers. You lot can supersede the Name.com default nameservers with the following:
- ns1.digitalocean.com
- ns2.digitalocean.com
- ns3.digitalocean.com You will be asked to update each change individually, and to Apply Changes in one case you are finished with your edits. Be sure to too delete the 4th default nameserver from the list.

-
Now you lot are ready to move on to connecting the domain with your Droplet in the DigitalOcean control console. Check out the Conclusion section at the cease of this article to read about what to practise next.
This department of the guide was concluding updated on Feb 16, 2018
-
Sign in to your Network Solutions business relationship.
-
Select My Domain Names.

-
Find the domain name that you want to apply with your Droplet, then select Modify Where Domain Points.

-
Select Domain Name Server (DNS), then select Go on.

-
Enter the following nameservers:
- ns1.digitalocean.com
- ns2.digitalocean.com
- ns3.digitalocean.com

-
Select Go on, then confirm your changes on the adjacent folio by selecting Utilize Changes. Now you are prepare to move on to connecting the domain with your Droplet in the DigitalOcean control panel. Check out the Determination department at the stop of this article to read nigh what to do next.
This section of the guide was terminal updated on February sixteen, 2018
-
Sign in to your eNom account.
-
Under Domains, select Registered Domains. If you have multiple domains registered with eNom, select the domain name that you lot want to use with your Droplet.

-
Select DNS Server Settings.
-
Under User our Name Servers?, select Custom.
-
Enter the following nameservers:
- ns1.digitalocean.com
- ns2.digitalocean.com
- ns3.digitalocean.com

-
Select save, then ostend your changes in the popup past selecting OK. Now you are set up to movement on to connecting the domain with your Droplet in the DigitalOcean control panel. Check out the Conclusion department at the end of this article to read about what to exercise next.
This section of the guide was last updated on February 16, 2018
-
Sign in to your Gandi account.
-
Navigate to Domains on the left side of your dashboard.

-
Click on the domain you lot would like to use with your Droplet.
-
Select Nameservers from the menu on the left of your screen.
-
Click on the pen icon under the Change heading at the lesser of the Nameservers screen.

-
Fill up in the nameserver fields with the following:
- ns1.digitalocean.com
- ns2.digitalocean.com
- ns3.digitalocean.com

-
Click Relieve. Now yous are fix to motion on to connecting the domain with your Droplet in the DigitalOcean control panel. Check out the Determination section at the end of this article to read about what to do next.
This section of the guide was final updated on Feb 16, 2018
-
Sign in to your Register.com account.
-
Under the Account Dashboard, select Domains and so Manage from the list of available options.

-
Click Manage under Manage Production for the domain proper name you want to associate with your Droplet.

-
Under DOMAIN Proper name SYSTEM SERVERS (DNS SERVERS), enter the following nameservers into the New DNS Server fields:
- ns1.digitalocean.com
- ns2.digitalocean.com
- ns3.digitalocean.com

-
Select Continue, then ostend your changes on the next page by selecting Continue. Now you are gear up to motion on to connecting the domain with your Droplet in the DigitalOcean control panel. Check out the Decision department at the end of this article to read about what to do next.
This section of the guide was last updated on Oct 27, 2014
-
Sign in to your A Modest Orange account and select My Domains.

-
Find the domain name that yous want to use with your Droplet, then select Manage Domain to the correct of that domain name.
-
By default, A Pocket-size Orangish locks your domain to forbid it from beingness transferred abroad without your authorization. This means that before we tin change the nameservers, we'll need to disable this lock. Select the Registrar Lock tab, so select Disable Registrar Lock.
-
Select the Nameservers tab.
-
Enter the following nameservers:
- ns1.digitalocean.com
- ns2.digitalocean.com
- ns3.digitalocean.com

-
Select Modify Nameservers to apply your changes. Now you are ready to move on to connecting the domain with your Droplet in the DigitalOcean command panel. Bank check out the Conclusion section at the terminate of this article to read on what to do side by side.
This section of the guide was last updated on February 16, 2018
-
Sign in to your iwantmyname account and select the Domains tab.
-
Select the domain name that you want to use with your Droplet.
-
Under Nameservers, select update nameservers.
-
Dissimilar many other domain registrars, iwantmyname features a card of popular web hosts with preconfigured DNS settings.

-
Choose DigitalOcean (ns1-3.digitalocean.com) from the dropdown menu, and the fields below will be automatically filled in with the right settings.

-
Select Update nameservers to apply your changes. Now you lot are gear up to move on to connecting the domain with your Droplet in the DigitalOcean command panel. Bank check out the Conclusion section at the end of this article to read about what to do next.
This section of the guide was last updated on February 26, 2019
-
Sign in to your Google Domains account.
-
Select the domain proper name that you desire to use with your Droplet.
-
On the lefthand navbar, click on DNS.

-
Click on Use custom proper name servers.

-
Enter the following nameservers:
- ns1.digitalocean.com
- ns2.digitalocean.com
- ns3.digitalocean.com

Notation: You lot'll need to striking the + to the right of the nameserver field to make more than fields visible.
-
Select Salvage to apply your changes. At present you are prepare to move on to connecting the domain with your Droplet in the DigitalOcean command panel. Check out the Conclusion section beneath to read about what to do side by side.
Summary
Information technology volition take some time for the proper name server changes to propagate after you've saved them. During this fourth dimension, the domain registrar communicates the changes you've made with your Isp (Internet Service Provider). In plough, your Internet access provider caches the new nameservers to ensure quick site connections. This process usually takes about xxx minutes only could take upwardly to a few hours depending on your registrar and your Isp'southward communication methods.
What's Adjacent?
Once your domain is pointed to DigitalOcean's nameservers, you tin begin managing its DNS records from the Command Console. Run into How to Create, Edit, and Delete DNS Records and How to Add a Subdomain to Your Domain to get started. You lot can as well learn more nigh how DNS works in An Introduction to DNS Terminology, Components, and Concepts

Website Hosted On Ec2, Domain Registered At Gandi.net.. How Do I Properly Configure The Domain?,
Source: https://docs.digitalocean.com/tutorials/dns-registrars/
Posted by: stewartproughat.blogspot.com
0 Response to "Website Hosted On Ec2, Domain Registered At Gandi.net.. How Do I Properly Configure The Domain?"
Post a Comment